
Here's how the Menagerie works in Destiny 2.
Our Destiny 2 Menagerie guide contains everything you need to know about this activity, including how to access it, how to earn Imperials, upgrade your Chalice, complete stages and defeat the boss.
The Menagerie is Destiny 2’s latest six-man matchmade activity and it’s a whole bunch of fun. In many ways, it’s like a mini-raid. You’ll fight your way through a handful of stages which feature a mixture of platforming, wave-clearing and orb-dunking.
This variety means it’s incredibly moreish, which helps, because you’ll earn a new currency called Imperial which goes towards upgrading your Chalice of Opulence. As you grind out the Menagerie you’ll begin outfitting this unique item with Runes and special abilities to maximise and tailor your loot gains.
Below we’ve put together everything you need to know about the Menagerie, and we’ll continue updating this page as Bungie iterates on the mode overtime – stay tuned!
Navigation:
Need help with something specific? Use the following links to jump straight into what you’re after!
What is the Menagerie?
The Menagerie is a six-man matchmade activity which sees players fight through various challenges to unlock powerful rewards.
It’s essentially a mini-raid, with new currencies, upgrades and rewards which drive the gameplay loop.
Strangely enough, you can’t actually lose in the Menagerie, but your overall performance will affect the rewards you earn upon defeating the final boss.
How do I access the Menagerie?
When you first boot up the game, you’ll be greeted with a new Pursuit (which can be found in the Director now) called “Imperial Summons”.
The first step is to speak with Benedict 99-40 in the Tower to get “The Invitation” questline underway. This is what you’ll need to complete in order to gain access to the Menagerie.
We’ve put together a complete The Invitation Quest guide page which contains a walkthrough of the entire questline, and features easy ways to tick off each task.
How to complete every Menagerie challenge
Here’s a quickfire breakdown of how each challenge works and how to complete them all.
The Lamplighting
- Take down the Lamplighter Knights which will spawn around the arena.
- Grab the orbs they drop and drop them into the lamps dotted around the stage.
- Rinse and repeat this process as quickly as you can to progress to the next area.
The Riposte
- The main objective here is to slay as many Tamed Knights as possible.
- Cherished Darkblades will spawn around the arena. Defeat these and they’ll drop a Relic Sword. Use this to deliver huge damage to shielded enemies and clear mobs with ease.
- Stick together and use wave-clearing Supers to maximise your chances of survival.
The Crystals
- Eliminate Vex enemies and you’ll notice Void Cannons spawning across the room. Use these to destroy the Crystals dotted alongside the outer edges of the arena.
- Void Crystals have a very limited ammo supply, so try and avoid splurging it on groups of enemies.
- Stick together and use the Warlock’s Well of Radiance Super if you’re struggling to stay alive.
The Arkborn
- Arkborn Souls (green pillars of glowing light) will spawn across the arena. Your aim is to run through these to gather Souls and deposit them at the yellow crystals on either side of the room.
- You only have a limited time to deliver Souls, so try and deposit them as quickly as possible.
- Deposit enough and a Treasure Ogre will spawn in the centre of the arena. You will need to defeat it to reset the room and get back to the previous task.

The Gauntlet
- A total of three players will be whisked away at random to participate in an assault course. The aim is for one member to reach the end unscathed as quickly as possible.
- Upon completion, all three teammates will rejoin their party.
The Hunted
- Navigate the corridors and capture various zones by standing in them. You’ll need to fend off hordes of enemies while doing so.
- Again, this is a case of sticking together rather than splitting up, otherwise you’ll be overwhelmed quickly. We’d recommend using Barricades and Rifts to make the process a little easier.
The Mockery
- There’s a dome with a glowing yellow crystal in the centre – stand in this and you’ll receive the “Touch of the Sky” buff.
- The “Touch of the Sky” buff allows you to exit the dome and remain unharmed, however, it’s on a timer. Once it expires, you’ll receive a debuff called “Touch of the Deep” which means you’ll take damage over time unless you retreat back to the dome.
- Your main aim is to kill the Wizards which spawn around the arena, grab the orbs they drop and bring them back to the dome.
- Essentially, you’ll want to clear as many enemies as possible while balancing the buff and debuff you’ll receive throughout the encounter.
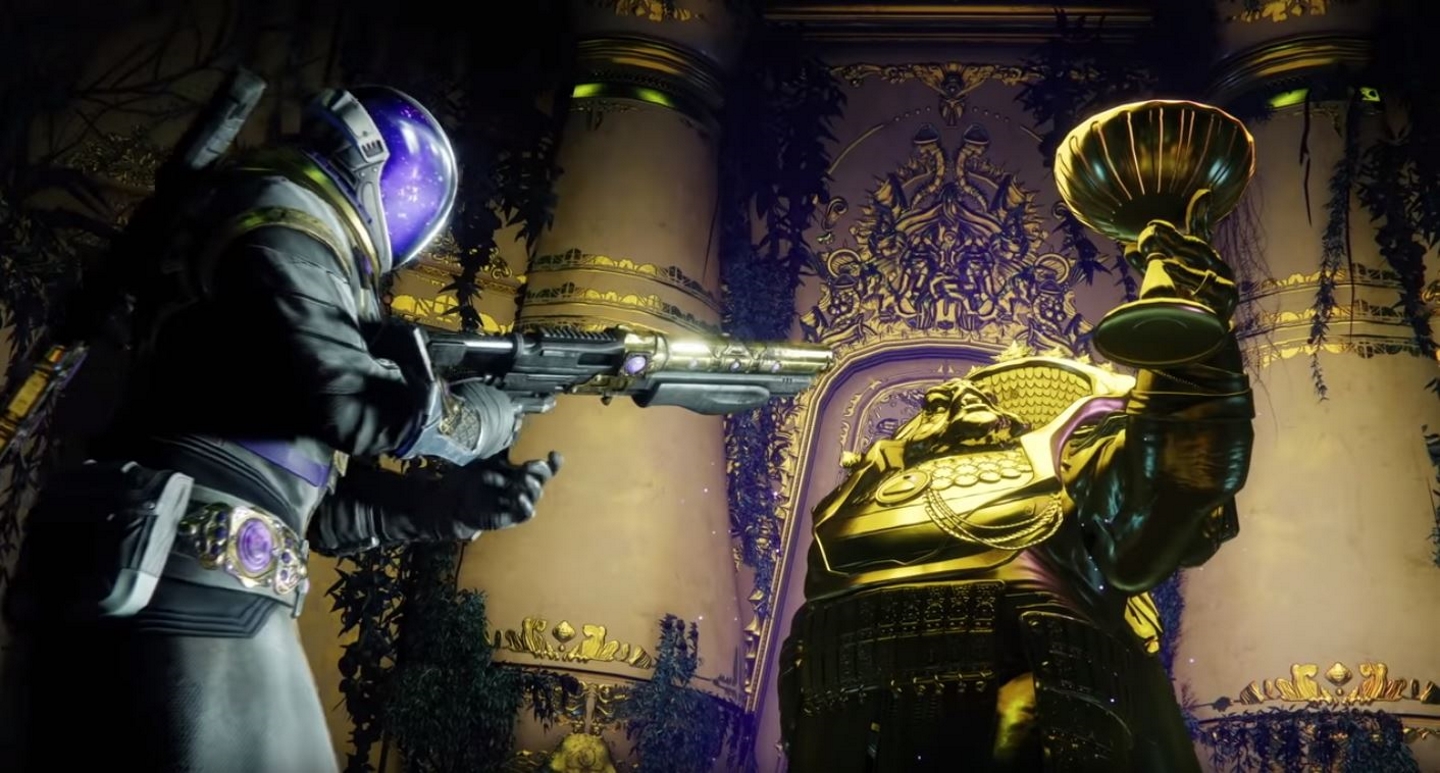
Boss #1: Hasapiko, Beloved by Calus
Over the Season of Opulence Bungie will introduce new bosses and stages to the Menagerie. We’ll add guides for each boss overtime, so keep an eye on this section for more.
Hasapiko’s a huge Vex Minotaur who starts off with an impenetrable shield. To take it down, you’ll need to eliminate Hasapiko’s Living Firewalls which spawn around the arena.
Destroy one of these Living Firewalls and they’ll leave a glowing white field on the arena. Stand on these and you’ll be able to deal damage to Hasapiko’s shield. We’d recommend sticking together and equipping power weapons when you’ve got the chance to damage its shield as it’ll maximise damage output.
Once Hasapiko’s shield has gone down, you’ll be able to damage its health bar. It’ll make life more difficult for you by directing walls towards you which you’ll need to dodge, or face insta-death.
It’s important that you put some distance between yourself and Hasapiko here, so you’ve got plenty of time to both dish out damage and dodge the walls.
Eventually Hasapiko’s shield will come back up and you’ll have to repeat this process until its health bar drops very low. Things will change a little here, though.
Three Quantum Hydras will now spawn in the arena which you’ll need to destroy before the final three Living Firewalls make an appearance.
At critical health levels, Hasapiko will begin spawning tougher walls to dodge and that’s about it really. It’s best if you all split up and stand towards the back of the arena as the walls are incredibly vast, and openings to dodge them are now very slim indeed.
When you take him down for good, a chest will spawn at the back of the arena. Crack it open to claim your rewards!
How does the Chalice of Opulence work?
Imperials
Let’s start with Imperials, the new currency which you will invest in upgrading your Chalice.
You’ll earn Imperials via completing Triumphs related to the Menagerie, which you’ll actually need to claim via the Triumphs tab in the Director.
Complete the Menagerie and you’ll gain access to certain chests which will grant your Imperials. One can be cracked open after the final boss and you can also spend 5K Glimmer on chests at the back of the Barge (home of Werner 99-40) to net yourself even more once you’ve completed a successful run too.
Menagerie bounties handed out by Werner 99-40 will also net you Imperials. So it’s very much a case of running through the Menagerie as often as possible to earn yourself this all important currency.
Imperials are used to unlock Rune Slots and other upgrades which increase your chances of powerful loot drops in the Menagerie and more.
Video by xHOUNDISHx
Runes
Next up, Runes. These are modifiers which confer benefits when you run through the Menagerie.
Slot Runes into your Chalice and you can begin fine-tuning the type of loot rewards you’ll receive from Menagerie runs. The more Runes you’re able to equip (via unlocking more slots using Imperials), the more specific you can tune the loot you’ll receive.
Runes can be obtained via Menagerie bounties, and you can also purchase the Runefinder consumable from Werner 99-40 which will give you a chance of obtaining a new rune from Crucible, Gambit or Strikes.
